Couture Snippets #1
Haute couture (French for "high sewing" or "high dressmaking"; pronounced: [ot kutyʁ], English pronunciation: /ˌoʊt kuːˈtʊər/) refers to the creation of exclusive custom-fitted clothing. Haute couture is made to order for a specific customer, and it is usually made from high-quality, expensive fabric and sewn with extreme attention to detail and finished by the most experienced and capable seamstresses, often using time-consuming, hand-executed techniques. Couture is a common abbreviation of haute couture and refers to the same thing in spirit.[1]
It originally referred to Englishman Charles Frederick Worth's work, produced in Paris in the mid-nineteenth century.[2] In modern France, haute couture is a "protected name" that can be used only by firms that meet certain well-defined standards. However, the term is also used loosely to describe all high-fashion custom-fitted clothing, whether it is produced in Paris or in other fashion capitals such as Milan, Tokyo and London.
The term can refer to:
 Start by sewing the seam the zipper will go in. Invisible zippers can be put in any straight seam. You will leave an opening in the top portion of the seam that is 1 to 1 1/2 inches shorter than your zipper. If you zipper is 9 inches (just the teeth, don't include the extra below the spot the zipper tab stops) then you will have a 7 1/2 to 8 inch opening. Sew the seam below that point.


It originally referred to Englishman Charles Frederick Worth's work, produced in Paris in the mid-nineteenth century.[2] In modern France, haute couture is a "protected name" that can be used only by firms that meet certain well-defined standards. However, the term is also used loosely to describe all high-fashion custom-fitted clothing, whether it is produced in Paris or in other fashion capitals such as Milan, Tokyo and London.
The term can refer to:
- the fashion houses or fashion designers that create exclusive and often trend-setting fashions
- the fashions created
This definition found here.
That said, I hear the word 'couture' used for the 'proper way to sew something'.
I'm using it in the name of my tutorials. 'Couture Snippets'
Now. Don't expect a tutorial every day! Or even every week for that matter:)
And by all means do not consider my tutorials the only way or even the best way something could be done! Just because I'm using the word 'coutoure' does NOT make me the one and only or best seamstress out there. By far the opposite if I were truthful:)
I have had requests for tutorials on a few things.
So I am going to try to be accommodating. I want to do this. I love the tutorials I've used from other bloggers. A seamstress can never know too many fun tricks of the trade. There's always a quicker, easier, or more fun way to do something:) And while I'd like to do this every week I am being realistic. Life gets hectic. I never have enough time to do everything I WANT to do now. So I will do them when I can:)
First up is an invisible zipper.
It's been so long since I did the other kind I almost forget how.
Invisible zippers are the way to go. It's, well, invisible!! Hence the name:)


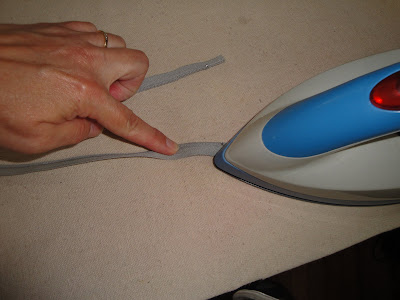
Press that seam open. Press back the edges that were not sewn the same amount as your seam allowance. I use 5/8 inch seams and press the open edges back that far too.


Next open the zipper


Press those zipper teeth the opposite way from what they already are. press them as flat as you can. This is VERY important:)

Use your machines 'zipper foot'. Every machine should come with one. If yours didn't go buy a zipper foot that works with your machine or get a new machine.

Your zipper will end up sewed in this way. Right side of zipper against the wrong side of the fabric. That's the end goal.

Place your fabric right side down and your zipper also, right side down.

Make sure the seam allowance that you pressed back is laid out flat, not folded back. You will use the crease you ironed in as your guide line. You want your zipper teeth right on that fold line.

You zipper foot will allow you to sew with your needle right beside the zipper teeth. I change my needle postion slightly to get it as close as possible.

Continue to sew along the zipper teeth, keeping the teeth right on that creased fold you made when you pressed the seam allowance back.

Sew down as far as you can. You should have an inch or so of zipper feet that extend beyond the point where your seam starts. Just stitch to this point and backstitch.
Done with side one.

This is what it looks like with one side sewn in.

Your zipper sides should both start at exactly the same spot at the top for everything to end up smooth at the bottom when you are finished.

Sew the second side just like the first. Zipper teeth on the fold line, sew as far as you can to the bottom.


This is what you should have left at the bottom of your zipper when you have finished sewing side 2.

Close the zipper.

Check the right side. It should look like this. Invisible.

Now it's time to stitch down that little end that's left!

Open out your seam allowance under that last couple inches of the zipper. Sew the remaining part of the zipper to the seam allowance from where you stopped to the bottom of the zipper. Your garment is all folded to one side and you are stitching through ONLY the zipper and the seam allowance.


One side of the bottom part sews from the top down and the other from the bottom up. You only need to sew down the couple of inches that were not already sewn in the first couple steps.

Voila! All you see is the tab at the top. That's the beauty of an 'invisible' zipper:)

Inside view. i turned down and topstitched the top of this skirt after the zipper was in.

Here is what it looked like when i pressed it before turning down the top and topstitching to finish it. Once I turned that down the tab was completely at the tip of the seam. If you have space above where the zipper stops when your garment is finished you need to add a hook and eye. I don't like hook and eyes. So I eliminate that as often as possible:)

Finished:)
So. Did that help you at all? I'm sure the pictures do WAY more than any instructions I can write here. A picture is worth a thousand words you know! Let me know, should 'Coutoure Snippets' become a regular part of 'Sew a Fine Seam'? What would you like pictorally explained??
Labels: couture snippets, invisible zipper, sewing, skirt, tips, tutorial, zipper
posted by Sew a Fine Seam at
1:11 PM
![]()
![]()

5 Comments:
Beautiful! I love tutorials! I like to sew with other people because you always learn a new technique or trick!
Yes! Yes! I am always into learning more about sewing techniques. I especially like ones like this that aren't necessarily a whole project, but something you would use in lots of projects. Keep them coming!
Danita
Love it, always heard the term "haute coutoure" and never knew precisely what it meant. I knew it had something to do with clothing but I thought it meant "hot fashion". Thanks for the schooling :o)
And thanks for the step-by-step instructions. After I came home from sewing with you that day I scratched my head and said "what did Jill say?" lol. That first skirt is still sitting there with one lonely seam sewn and pressed. It's on my to-do list for next week!
What an informative post, thank you. As for my zipper foot, ahem... I "lost" it so the new machine suggestion is a perfect one ;)
Holy Wow batman! That is the best tutorial on zipper installation I have ever seen!!! Thank you so much for a great blog!
Post a Comment
Thank you for all the 'Fine' Comments! I enjoy them all!
Subscribe to Post Comments [Atom]
<< Home